Some words on the history of biscuits in general as provided by Wikipedia for the curious. When J & I were in Ireland, we asked our lovely hosts the following question: If crisps are chips, and chips are french fries and a biscuit is a cookie, what's a biscuit? That is when we learned that there is no such thing as an equivalent to REAL American biscuits in Europe. The closet you can get is a scone, and that's just not right. So, biscuits have a very important place in the American-ness of things. Scones are great and all, and they can be savory or sweet, but it's still not a biscuit. Biscuits and Gravy wouldn't work with a scone. Eeeewwwwww.
Anyway, I should say that these biscuits might not live up to anyone's expectations but mine. They aren't flakey-type biscuits. They are dense, soft on the inside, golden and crunchy on the outside, buttermilk biscuits. Grandma learned from her mom, who learned from her mom, and other than making the switch to self-rising flour, I doubt much has changed since then. I'm very excited to try and make these at home, and you can probably expect another post with my attempts too. This seems like such a simple thing--biscuits, but it's the quintessential thing that I think of when I think of my Grandma. She took care of us and loved us through good, homemade food. I make my pancakes with Biscuick because it's easy, but these biscuits... this is home to me. I don't know how else to say it. These biscuits are the cornerstone of home cooking.
Making biscuits with my grandma is one of my best memories of childhood. It isn't just one memory. It's lots of memories all rolled into one. Some of the details are mixed up. In my memory, the bacon drippings lived in a Yuban can above the stove. They actually have their own container with a strainer. Also, the way I remember it happening is that Grandma would pour buttermilk into THE BOWL until it made biscuits. Turns out, there are a few more steps than that. 10 steps to Grandma's biscuits--not too bad really!
Some things just don't change. For instance, this is THE BOWL. This bowl lives in this cabinet on this pull-out tray thingy. There's a cover for it, so it doesn't... go bad... however flour does that. Weevils I think. Anyway, this is where it lives, right next to the sifter. The sifter is probably as old as the bowl and both are older than me.
Step 1: Get out THE BOWL and a sifter. Sift some of the flour from the bowl back into the bowl--about two sifters full. Self-rising flour makes this much easier. If you only have regular flour, you'll need to adjust the amounts of baking stuff, but I'll get to that later. Now would be a good time to heat the oven to 375. Yesterday would have been a good time to have made some bacon so you would have some bacon drippings ready. They're the secret ingredient.
Step 2: Make sure you have buttermilk. We were out, so there was a trip to the store first. These are BUTTERMILK biscuits, so this is a very important step.
Step 3: Into ANOTHER bowl, put 1 1/2 cups of the sifted flour, then make a nest in THE BOWL (which should be big enough to comfortably fit in the crook of your elbow and rest against your hip). This nest is very important.
Step 4: Measure out 1 tsp baking powder and 1/4 tsp baking soda. You don't have to use these measuring spoons, but these are the ones Grandma always uses. They are also older than I am. Also, if you're using all-purpose flour, go ahead and add an additional 1 1/2 tsp baking powder and a pinch of salt.
Step 5: Stir all the dry ingredients together with a GIANT SPOON. Why a giant spoon? Because that's how Grandma does it. That's why!
Step 6: Pour some buttermilk into the other bowl (which you can sort of see here is a plastic thingy with a handle and a pour spout) until it becomes the right consistency. This is the tricky part. You just sort of have to eyeball it. You want it thicker than pancake batter, sort of cake-batter ish, but it will be lumpy and that's ok. It's not runny, but not really stretchy like bread dough. It's soft and still pours, but has some thickness to it. It's hard to describe, and I have a feeling it will be hard to replicate. Remember, I've never actually done this part before.
Step 7: Pour the batter back into the nest in THE BOWL.
Fold the flour from the outside into the ball of batter until... well until it's biscuit dough. Again, this is an eyeball and fingertip thing. You want the dough to be stiff enough to handle, but not so stiff that it doesn't stretch.
It helps if you keep turning the bowl instead of your hand so you get the flour from all of the edges worked into the middle. You'll work all the way around the bowl at least twice. I think. I mean, it's all approximate. This is Boswellian cooking after all.
Step 8: Grease The Biscuit Pan. This is the Biscuit Pan.
It's the same pan Grandma always uses. It's not 9x13, it's sort of... 10x7, but you can use any pan you like. I don't know how glass would work though, so stick to metal if you've got it. Anyway, you want to lightly grease the bottom and sides. We sort of cheat and use PAM.
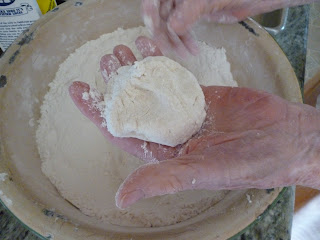
Step 9: Pinch off a little bit of dough and, between two very well floured hands, "roll 'em up, roll 'em up, put it in the pan." You don't have to say that every time, but as kids, we always did. It gave Grandma time to watch us and make sure we were getting them smooth and pretty. See how wonderful Grandma's biscuit looks?
See how bumpy and wiggly MINE look? Obviously, not much has changed since I was doing this as a kid. Anyway, the goal is to roll them gently until they're smooth on top, then tuck the ugly side to the bottom of the pan.
Step 10: BACON! Ok, not actual bacon, but the drippings of. The grease that's left behind after making bacon. The secret ingredient to perfect biscuits. Grandma keeps hers in this container.
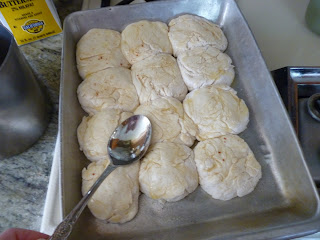
No, it's not full, but it's got enough. You take the back of a spoon and rub down all the exposed biscuit parts, even the sides and in between and the cracks and crannies.
Then you bake for 23-27 minutes in your 375 degree oven. Set the timer for 23, then check to see if the biscuits are the right color. This is the right color, golden brown and AWESOME. Actually, while the biscuits are in the oven would be a great time to fry up some bacon (save the drippings for next time!) and make some eggs.
Pile them on a plate. Serve with butter, honey, jam and gravy so everyone can fix their biscuits the way they like them.
Ta-da! Breakfast at Grandmas. Which we eat at lunch time. Because breakfast is actually Yuban coffee and crossword puzzles. Naturally.
There it is--the fluffy, golden, wonderful biscuits! Every time Grandma makes them they are just as good as I remember. She made me promise that when I start making them, I can't give up if they don't turn out right the first 172 times or so. She says it takes practice to get the just right, and I'm willing to try. I need to get some bacon first though. Biscuits without the secret ingredient just wouldn't work, would it?
Alright, here's the whole shebang in one easy-to-read list-type format!
Grandma's Buttermilk Biscuits
makes 12
Ingredients:
- 1 1/2 cups self-rising flour, sifted
- about 2 cups self rising flour, also sifted, for the nest
- 1 tsp baking powder
- 1/4 tsp baking soda
- Buttermilk--no clue on amount here. A cup? Cup & a half?
- Bacon drippings
Directions:
- Preheat oven to 375 degrees
- Grease your pan
- Mix all dry ingredients together
- Stir in buttermilk until batter is thick, but pourable. Similar to cake batter, not as stiff as brownie batter
- Put batter into flour nest. Fold in flour until dough is stiff enough to handle and roll
- Roll into palm-sized balls
- Pat each biscuit with bacon drippings, making sure to cover all exposed surfaces--corners, edges, cracks & crannies
- Bake for 23-27 minutes, until golden brown


